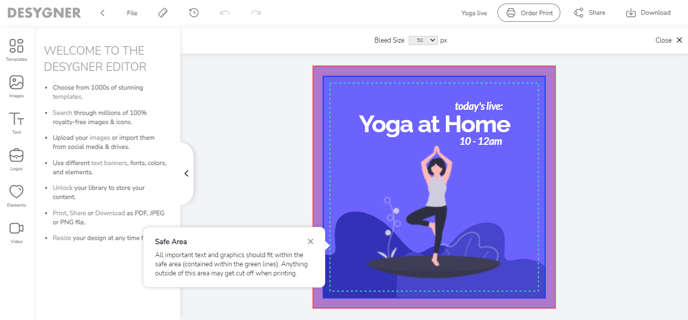
Bleed refers to an area on a design that falls outside the final dimensions of a printed document. There is usually around 4mm (0.157″) allowance beyond the crop marks (depending on the printer’s requirements) if the printed stack of pages or cards moves slightly when trimmed at the printing company.
Within Desygner, you can adjust your design elements to make sure you leave enough bleed for printing purposes.
Setting the bleed manually
Within the editor, choose File and then Manage bleed and safe are. At the top, you can choose a different amount of bleed depending on your printer’s requirements.
You will see a red area around your design that shows you which elements will be outside the cutting area. You can make adjustments to your elements to fill up this area.-1.png?width=688&name=mceclip1%20(1)-1.png)
Setting the bleed with Digital Print or the Global Print Network
When you choose to purchase prints and go through the initial paper choice steps, you will come to a section where the platform will show you the bleed on your design to check that you have adjusted your elements to fill this area. You can make adjustments here to ensure that you have enough.
You will not see crop marks on your PDF proof because the printers we use automatically cut 4mm (0.157″) off the edges of the paper.
Can a member change the bleed when downloading a design?
Yes. Currently, a member can fully edit any download settings including the bleed.
What is a safe area?
The Safe Area of your design is used as a guide so that your important elements like logos or text, for example, are not too close to the edge of the paper when it is printed and cut.
Just like bleed, having a little allowance on your design will ensure you receive a perfect result even if the printing company cuts your paper or card a little off the mark.
Checking the safe area
Within the editor, choose File and then Manage bleed and safe area. The broken green lines will show up on your design. It is best to keep your elements within these boundaries when you move elements towards the edge of the artwork unless you intentionally want to have an element bleed off the edge.
Setting the safe area with Digital Print or the Global Print Network
When you choose to purchase prints and go through the initial paper choice steps, you will come to a section where the platform will show you the safe area on your design to check that you have adjusted your elements to sit within this area. You can make adjustments here to ensure that the elements are not too close to the edge.
